React Tutorial: The Complete Learning Path from JSX to Your First Full App
Learn React in the right order, from the JavaScript prerequisites to components, hooks, routing, Redux, deployed projects, and the full-stack step.
KnowledgeGate Team
Exam prep & CS education
Updated 17 Aug 20266 min read
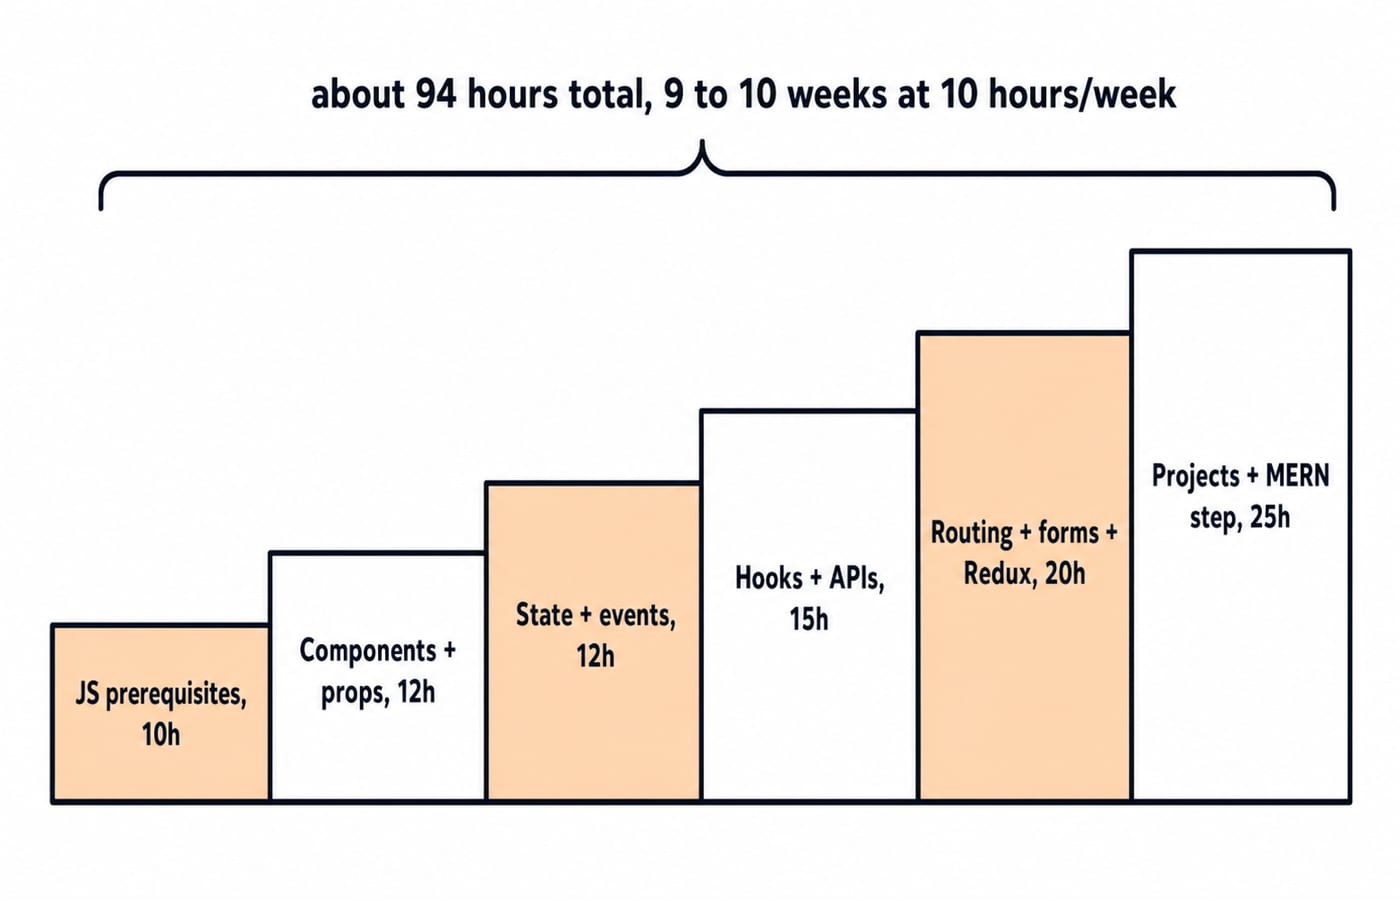
You have decided to learn React, but three tutorials start at three different places: JSX, a setup command, or Redux. The problem is not a shortage of material. It is the missing order. The order below is one JavaScript prerequisite followed by five React stages, about 94 hours of work in total, and every stage ends with a test you should pass before climbing to the next.
1. Before you touch React: the JavaScript you actually need
React is a JavaScript library. If your JavaScript is weak, every JavaScript error will look like a React error. You do not need to master the whole language first, but you should be comfortable with:
arrow functions and template literals
destructuring, such as
const { name, score } = studentarray methods, especially
.map()and.filter()the spread operator
Promises with
asyncandawaitES modules with
importandexport
Run this ten-minute self-test:
const students = [{ name: "Asha", score: 87 }, { name: "Ravi", score: 62 }];
const toppers = students.filter(student => student.score > 70).map(student => student.name);
The filter keeps Asha because 87 is above 70 and removes Ravi because 62 is not. The map then returns the name, so toppers is ["Asha"]. If this one-liner takes more than a few minutes, spend a week patching these gaps. Budget about 10 focused hours.
2. Stage 1: Components, JSX, and props (the mental model)
The mental model is simple: a React app is a tree of functions that return UI. Data flows down that tree through props.
Start with a component that prints one student's marks:
function ScoreCard({ name, score, maxScore }) {
  const percent = Math.round((score / maxScore) * 100);

  return (
    <p>{name}: {score}/{maxScore} ({percent}%)</p>
  );
}

export default function App() {
  return <ScoreCard name="Asha" score={87} maxScore={100} />;
}
Inside ScoreCard, the calculation is Math.round((87 / 100) * 100). First, 87 / 100 = 0.87. Then 0.87 * 100 = 87, and rounding still gives 87. The rendered result is Asha: 87/100 (87%).
Two rules matter here. Props are read-only, so ScoreCard must never assign score = 90. JSX also needs one parent element around sibling elements. The official React documentation recommends function components for new code. Treat class components as legacy code you may need to read, not your starting point.
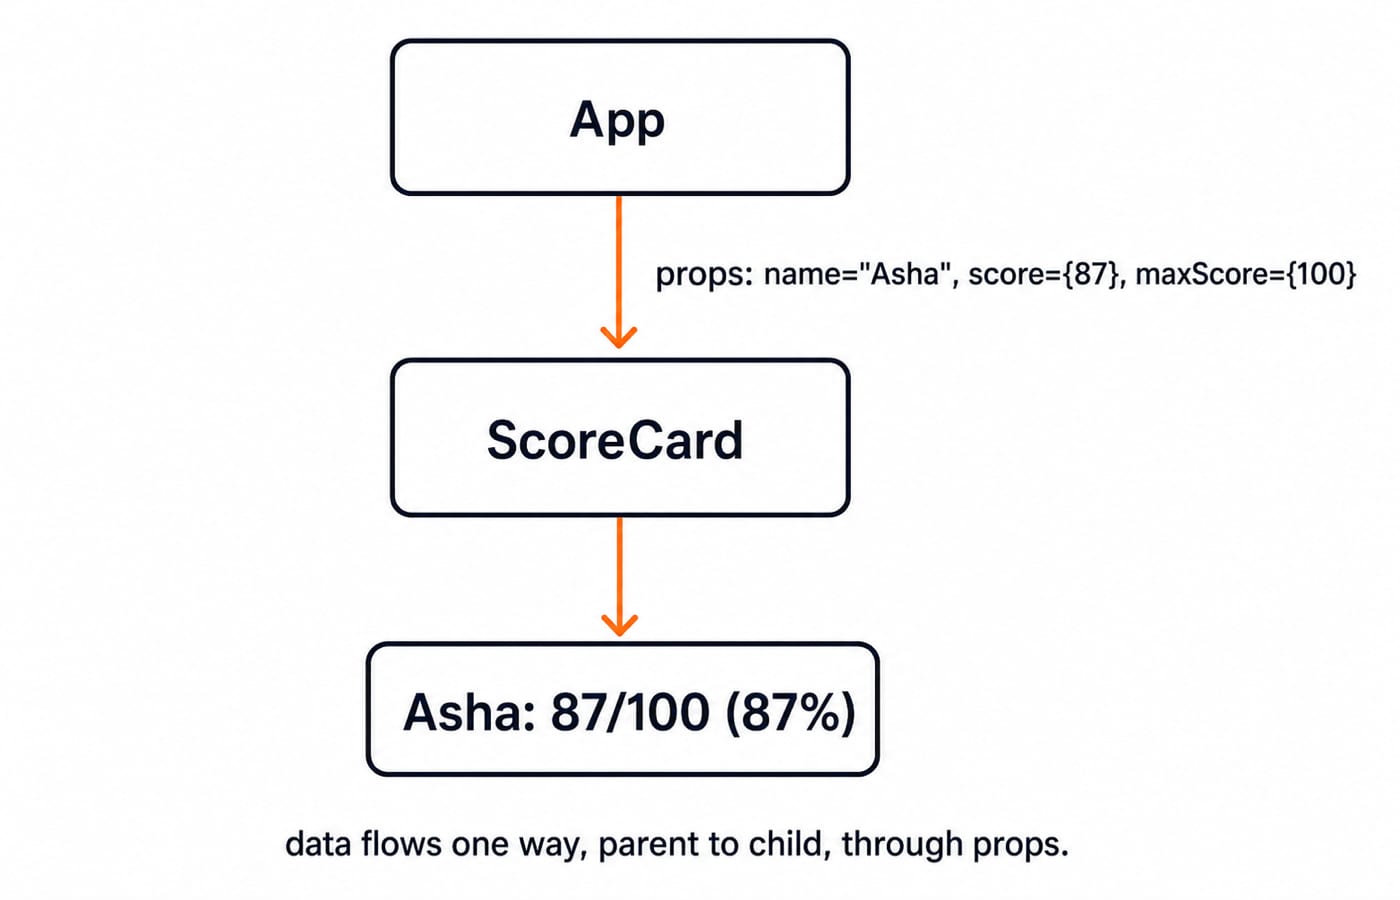
Your Stage 1 budget is about 12 hours.
3. Stage 2: State and events (making it interactive)
Props come from a parent. State is a component's own memory. Extend ScoreCard with an upvote button:
function ScoreCard({ name, score, maxScore }) {
  const [votes, setVotes] = useState(0);
  const percent = Math.round((score / maxScore) * 100);

  return (
    <div>
      <p>{name}: {score}/{maxScore} ({percent}%)</p>
      <button onClick={() => setVotes(votes + 1)}>Upvote ({votes})</button>
    </div>
  );
}
The button starts at Upvote (0). Three clicks call the setter three times, so the count goes to 1, then 2, then 3, and React re-renders the card after each update. The wrapper div is there because JSX still needs one parent element around siblings. Do not write votes++: that attempts to change state directly and does not update the screen correctly. Use the setter.
You are done with this stage when you can build a counter, a show-or-hide toggle, and a controlled text input without looking anything up. Budget about 12 hours.
4. Stage 3: Hooks beyond useState, and talking to APIs
useEffect becomes useful when you fetch data. The component renders, the effect fetches a list of ten students, and the response goes into state. You then use .map() to render ten ScoreCard components, with each student's name as its key.
For this first fetch, the effect needs an empty dependency array, []. Leave it out and the sequence can become fetch, set state, re-render, fetch again. That infinite loop can hammer the API.
Learn useContext next for shared values such as a theme or logged-in user, and extract repeated stateful logic into custom hooks. The official React documentation treats hooks as the primary API for stateful function components. Leave useMemo and useCallback for later, when you can identify a real rendering problem instead of adding them by habit. React Hooks Explained: useState, useEffect, useMemo, and Custom Hooks walks through each of these hooks with runnable examples. Budget about 15 hours.
5. Stage 4: Routing, forms, and Redux (multi-page apps and shared state)
React Router turns one page into an application. Build /students as a list and /students/asha as a detail page. Then add a controlled form with name and score fields. Before submitting, reject any score below 0 or above 100.
Redux should enter only when prop-drilling hurts. If the logged-in user or complete student list is needed by components five levels apart, a central store can help. Components subscribe to the data they need, and updates flow through dispatched actions. Many small apps never need Redux, but placement interviews and larger codebases still expect you to understand it.
Budget about 20 hours. If you want Stages 1 to 4 arranged as a structured programme, the React and Redux Course follows that progression.
6. Stage 5: Projects, then the full-stack step
Two or three finished small projects are stronger evidence than one ambitious clone left half-built. Use this ladder:
Build a marks dashboard around
ScoreCard, with sorting and a "toppers only" filter. For the sample data above, the rulescore > 70keeps exactly Asha because 87 is above 70 while 62 is not.Build a quiz app with a timer and result screen.
Build a notes or todo app that persists data in
localStorage.
Each project is done only when it is deployed on a free static host with a public URL. Running on localhost is a development milestone, not a portfolio result.
After React, add Node.js, Express, and MongoDB. They turn the quiz into a product with login and saved scores. The MERN Stack Course: Full Stack Development covers that complete ladder. Budget about 25 hours for the three projects.
7. How to run this as self-study (the honest schedule)
The six budgets total 10 + 12 + 12 + 15 + 20 + 25 = 94 hours. At 10 hours a week, 94 / 10 = 9.4 weeks, so plan for 9 to 10 weeks. That could mean two hours on each weekday or two five-hour weekend blocks.
Use a 60/40 practice rule. For every 60 minutes of video or reading, type code for at least 90 minutes. In a 150-minute block, that is 90 minutes of practice and 60 minutes of instruction, or 60% practice and 40% instruction. A stage ends when you pass its done test, not when a playlist ends.
If you miss a week, redo the previous stage's test before moving forward. Do not restart from zero. For placement preparation, practise DSA alongside React. Binary Trees and Binary Search Trees covers traversals, insertion, search and deletion, the core CS an interviewer will pair with your frontend questions.
8. The short version, and your next step
Patch your JavaScript first. Learn components and props with something as small as ScoreCard, add state and events, fetch real data with effects, introduce routing and forms, use Redux only when shared state demands it, and finish by deploying three projects.
Frontend roles and campus drives also test aptitude and CS fundamentals, so keep a second track running beside React. The Placement Preparation blog carries the aptitude, interview and company-process posts that go with it.
If you want this React ladder taught in order with projects at each step, start with the React and Redux Course. If your goal is a full-stack role, follow the MERN Stack Course: Full Stack Development instead. Pick the destination, then begin with the JavaScript self-test today.
Keep learning

JavaScript Event Delegation: Bubbling, target and currentTarget with Runnable Examples
Learn how browser events travel through the DOM, then build one delegated listener that handles nested controls and rows added later.
Updated 6 Oct 20265 min readWeb Development
JavaScript Operators: Types, Precedence and Runnable Examples
Learn how JavaScript arithmetic, assignment, comparison, logical and modern operators behave by tracing one score program from inputs to final output.
Updated 2 Oct 20266 min readWeb Development

JavaScript Data Types and Coercion: Beginner Tutorial with Runnable Examples
Learn how JavaScript stores values, copies primitives and objects, converts input, compares values and produces surprising output. Trace each rule in the console.
Updated 27 Sep 20265 min readWeb Development
JavaScript Conditionals and Loops: Beginner Tutorial with Runnable Examples
Learn how JavaScript chooses a branch and repeats work. Build from small syntax examples to a complete score classifier with a traced average.
Updated 25 Sep 20265 min readWeb Development