Node.js Tutorial: The Complete Learning Path from Zero to Job-Ready
Stop collecting disconnected Node.js videos. Follow seven ordered stages, prove each one with a small build, and finish with a capstone you can discuss in interviews.
KnowledgeGate Team
Exam prep & CS education
Updated 19 Aug 20265 min read
You have watched three separate Node.js videos, but built nothing and still cannot say what comes after "hello world". The problem is not effort. Node topics have hard prerequisites, and learning them out of order is why many tutorials stop making sense at the async chapter. In the right order, the path runs from JavaScript prerequisites through core modules, the async model, Express, MongoDB and authentication to a deployed capstone: about 13 weeks of part-time study, with one build to finish at every stage.
1. What Node.js actually is, and what it is not
Node.js is a runtime that executes JavaScript outside the browser using the V8 engine. It is not a language, a framework, or a browser replacement. JavaScript is the language, while the browser and Node.js are two different runtimes for it.
Developers use Node.js for REST APIs, command-line tools, real-time applications and build tooling. Using JavaScript on both the frontend and backend also makes it a common requirement in placement roles.
The platform can serve HTTP without Express or an npm install. Save this five-line file as server.js:
const http = require("node:http");
const server = http.createServer((req, res) => res.end("Hello from Node"));
server.listen(3000, () => {
  console.log("http://localhost:3000");
});
Run node server.js, then open http://localhost:3000 in a browser. The response is Hello from Node. That small result proves Node.js itself can listen for and answer an HTTP request.
2. Check your prerequisites before stage 0
You need JavaScript before Node.js: variables and scope, functions and arrow functions, arrays and objects, plus a first exposure to callbacks and promises. HTML and CSS are not required for this backend path.
Try this five-question mental check:
What does
[1, 2, 3].map(x => x * 2)return?What does
constprevent?What is a callback?
How do
==and===differ?What does
JSON.parsedo?
The answers are [2, 4, 6], reassignment of the binding, a function passed for another function to call, loose versus strict equality, and conversion of JSON text into a JavaScript value. If fewer than four answers felt confident, finish a structured JavaScript course first.
3. The Node.js learning ladder, stage by stage
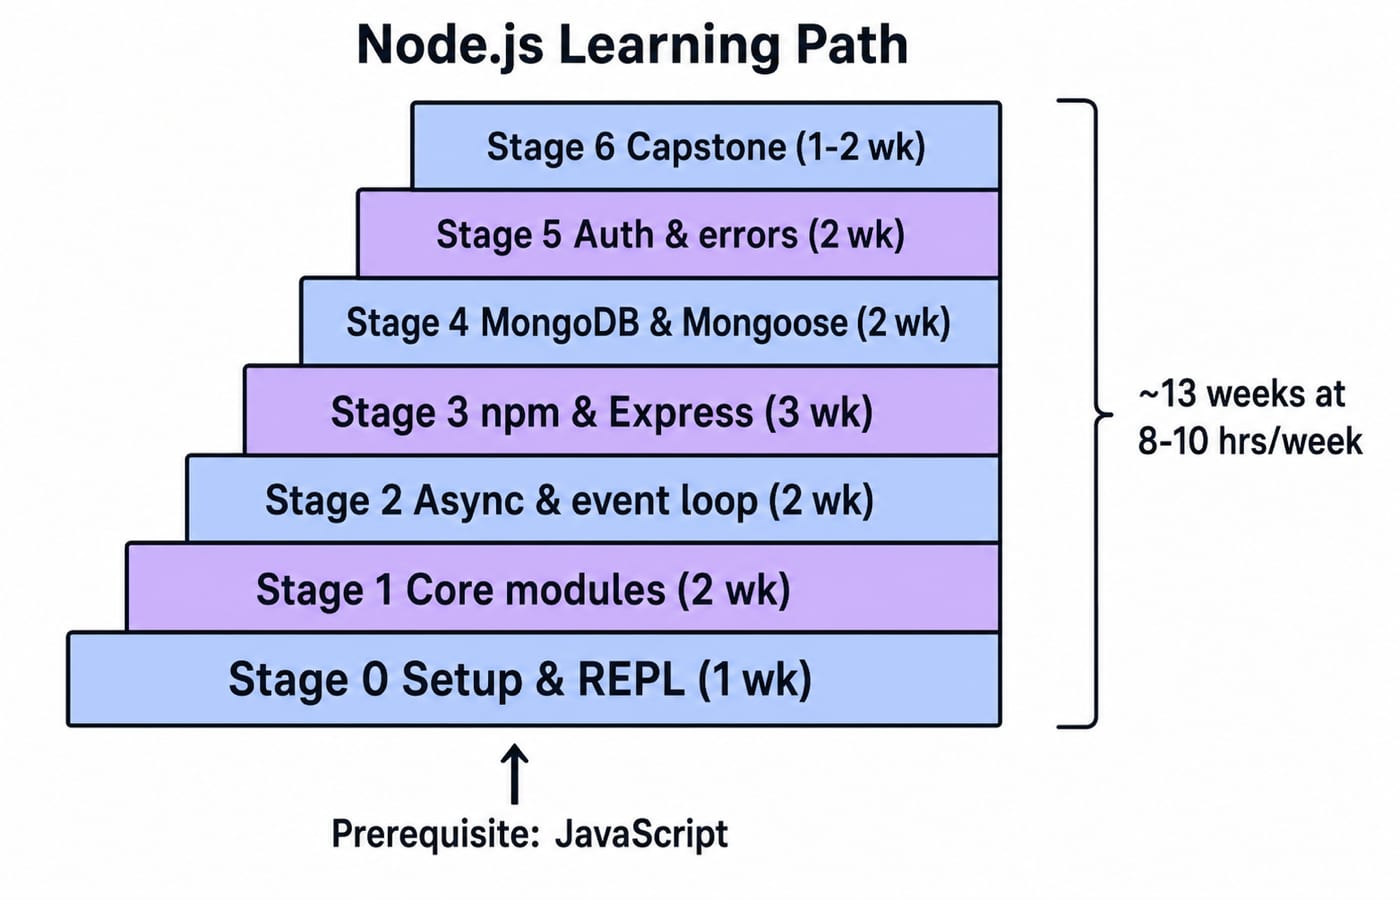
At 8 to 10 hours each week, the first six stages take 12 weeks. A one-week capstone makes 13 weeks in total, while a larger two-week capstone makes it 14. Treat 13 weeks as the working plan, not a deadline.
Stage 0: Setup and the REPL, 1 week. Install the current LTS release, checking the official Node.js documentation at nodejs.org rather than relying on a remembered version. Use the REPL, run a
.jsfile, and read the top line of an error stack first. Self-check: print the sum of numbers supplied throughprocess.argv.Stage 1: Core modules and the module system, 2 weeks. Learn
fs,path,httpandevents. Understand CommonJSrequire, ES Modulesimport, and why one project chooses a consistent system. Self-check: read a text file and write its word-count report using only core modules.Stage 2: The async model, 2 weeks. Learn callbacks, promises,
asyncandawait, and the event loop. Self-check: convert a nested-callback file script toasyncandawaitwithout changing its behaviour.Stage 3: npm and Express, 3 weeks. Learn
package.json, dependencies versus development dependencies, routing and middleware. Self-check: build the books REST API in section 5.Stage 4: MongoDB and Mongoose, 2 weeks. Learn documents versus tables, CRUD, schemas, validation, and database connections. The DBMS normalization guide is useful background on how databases organise data. Self-check: replace the books array with MongoDB while preserving every route and response shape.
Stage 5: Authentication, errors and configuration, 2 weeks. Add JWT-based authentication, centralised error handling and environment variables. Never commit secrets. Self-check: protect the books API write routes behind a login route that issues a token.
Stage 6: Capstone, 1 to 2 weeks. Deploy one project that combines stages 3 to 5. Self-check: another person can open it, authenticate, create data, receive useful validation errors, and read its setup instructions. This capstone becomes the resume line.
4. The one concept that decides everything: async execution order
Stage 2 is where self-study often breaks because code no longer appears to run strictly from top to bottom. Guessing the order makes every later bug feel random. Run this as a normal CommonJS .js file:
console.log("A");
process.nextTick(() => console.log("B"));
Promise.resolve().then(() => console.log("C"));
setTimeout(() => console.log("D"), 0);
console.log("F");
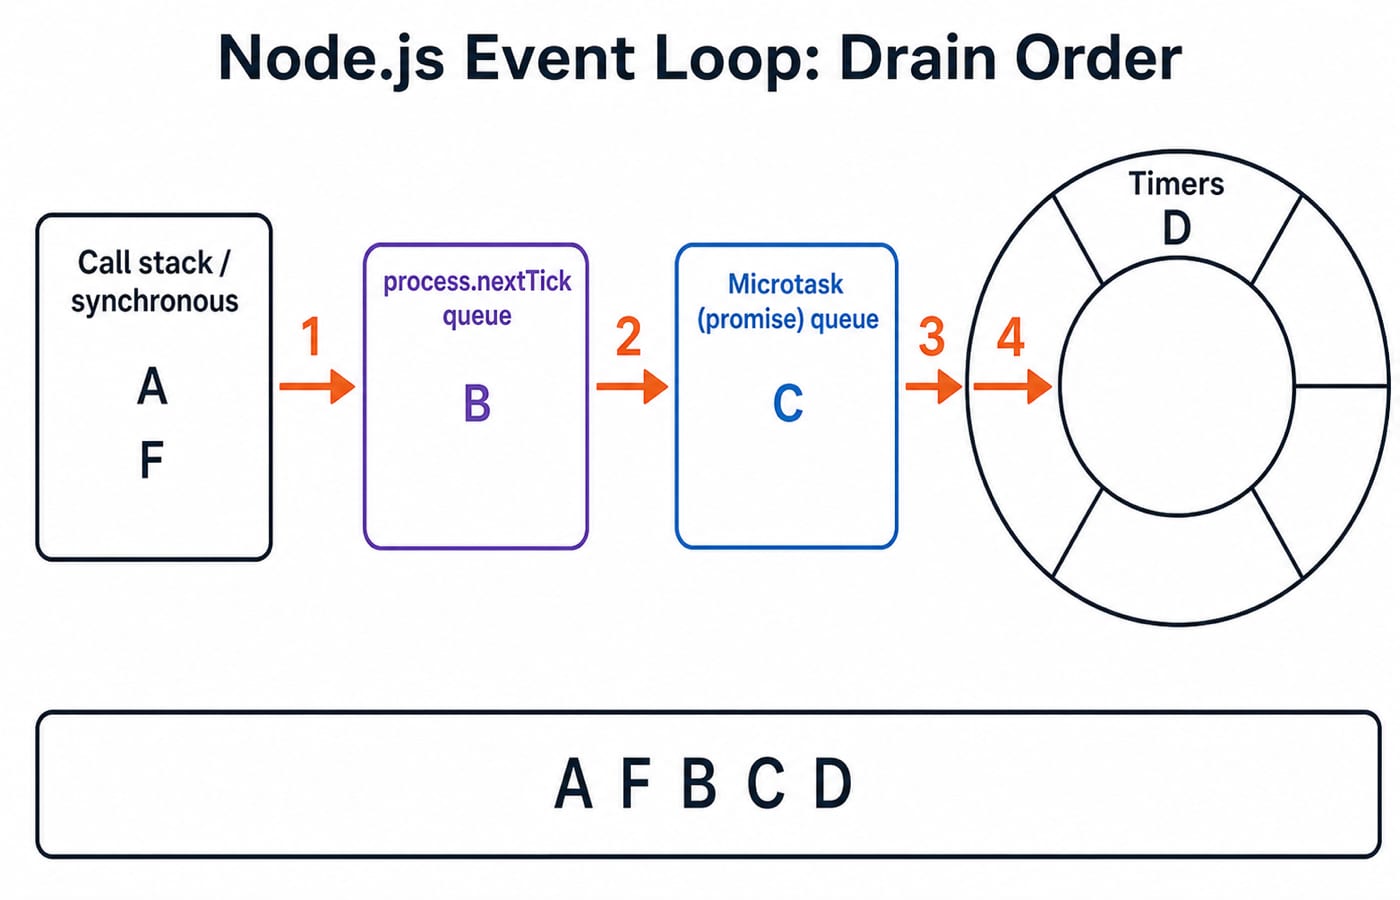
The printed order is A, F, B, C, D.
Synchronous statements run first, so
Aprints andFprints.Node.js drains the
process.nextTickqueue, soBprints.It drains the promise microtask queue, so
Cprints.The timers phase can then run the timeout callback, so
Dprints.
A delay of 0 ms means "not before the current synchronous code and all microtasks finish". It never means "immediately". The relative order of setImmediate and setTimeout(0) is deterministic only inside an I/O callback, a classic follow-up in Node.js interview questions for freshers.
5. What building at stage 3 looks like: the books API
Build a small Express app with logging middleware that prints method and path lines such as GET /api/books. Its required behaviour is precise:
Request | Body | Response |
|---|---|---|
| None | Status |
|
| Status |
| Missing | Status |
This tiny API is the backend job in miniature: routing, JSON input and output, status codes, middleware and validation. Stage 4 replaces its in-memory array with MongoDB without changing the routes.
6. How to self-study without drifting
Split each 8 to 10 hour week into roughly three hours of watching or reading and five to seven hours of typing code yourself. Never spend more time watching than building.
If you miss a week, rebuild the previous self-check from scratch before starting new material. Pausing carries no penalty, but skipping a prerequisite does. A stage is done when its build runs, not when its video ends. Keep every build in one Git repository from stage 0, and the capstone will sit on top of a visible record of the whole path.
7. The short version and your next step
Node.js interviews test the same abilities this path builds: predict async output, explain the event loop, and design a REST endpoint with correct status codes and validation. DSA rounds continue alongside backend preparation, so keep a parallel data structures and algorithms track active.
The short version is JavaScript first, seven ordered stages, one proof build per stage, and a capstone after roughly 13 weeks at 8 to 10 hours per week. The Node.js, Express.js & MongoDB course covers stages 1 to 5 in one sequence. After that, the MERN Stack course adds React to the same backend path. For more guides on this path, continue through the Web Development blog.
Keep learning
JavaScript Event Delegation: Bubbling, target and currentTarget with Runnable Examples
Learn how browser events travel through the DOM, then build one delegated listener that handles nested controls and rows added later.
Updated 6 Oct 20265 min readWeb Development
JavaScript Operators: Types, Precedence and Runnable Examples
Learn how JavaScript arithmetic, assignment, comparison, logical and modern operators behave by tracing one score program from inputs to final output.
Updated 2 Oct 20266 min readWeb Development
JavaScript Data Types and Coercion: Beginner Tutorial with Runnable Examples
Learn how JavaScript stores values, copies primitives and objects, converts input, compares values and produces surprising output. Trace each rule in the console.
Updated 27 Sep 20265 min readWeb Development
JavaScript Conditionals and Loops: Beginner Tutorial with Runnable Examples
Learn how JavaScript chooses a branch and repeats work. Build from small syntax examples to a complete score classifier with a traced average.
Updated 25 Sep 20265 min readWeb Development