Installing "Java" is not enough if the terminal runs java but cannot find javac, or an IDE silently uses a different JDK. Prove the setup: distinguish JDK, JRE and JVM, check PATH and JAVA_HOME, compile a fixed program, and trace its output. For Java, C, C++, Python and DSA, see Coding & Skill Development Courses.
1. Java, JDK, JRE and JVM: know what you are installing
Java is the language used in JdkSetupCheck.java. The JDK is the developer kit supplying javac, java and other tools. The JVM is the execution engine running bytecode from JdkSetupCheck.class. The JRE is the runtime component set already included in a full JDK.
Name | Role | Proof |
|---|---|---|
JDK | Provides | Both version commands work |
| Compiles source into bytecode | A new |
JVM | Executes the bytecode | The program output appears |
| Lets the shell locate executables | Location checks find both commands |
| Points tools and IDEs to the JDK root | The home check prints that root |
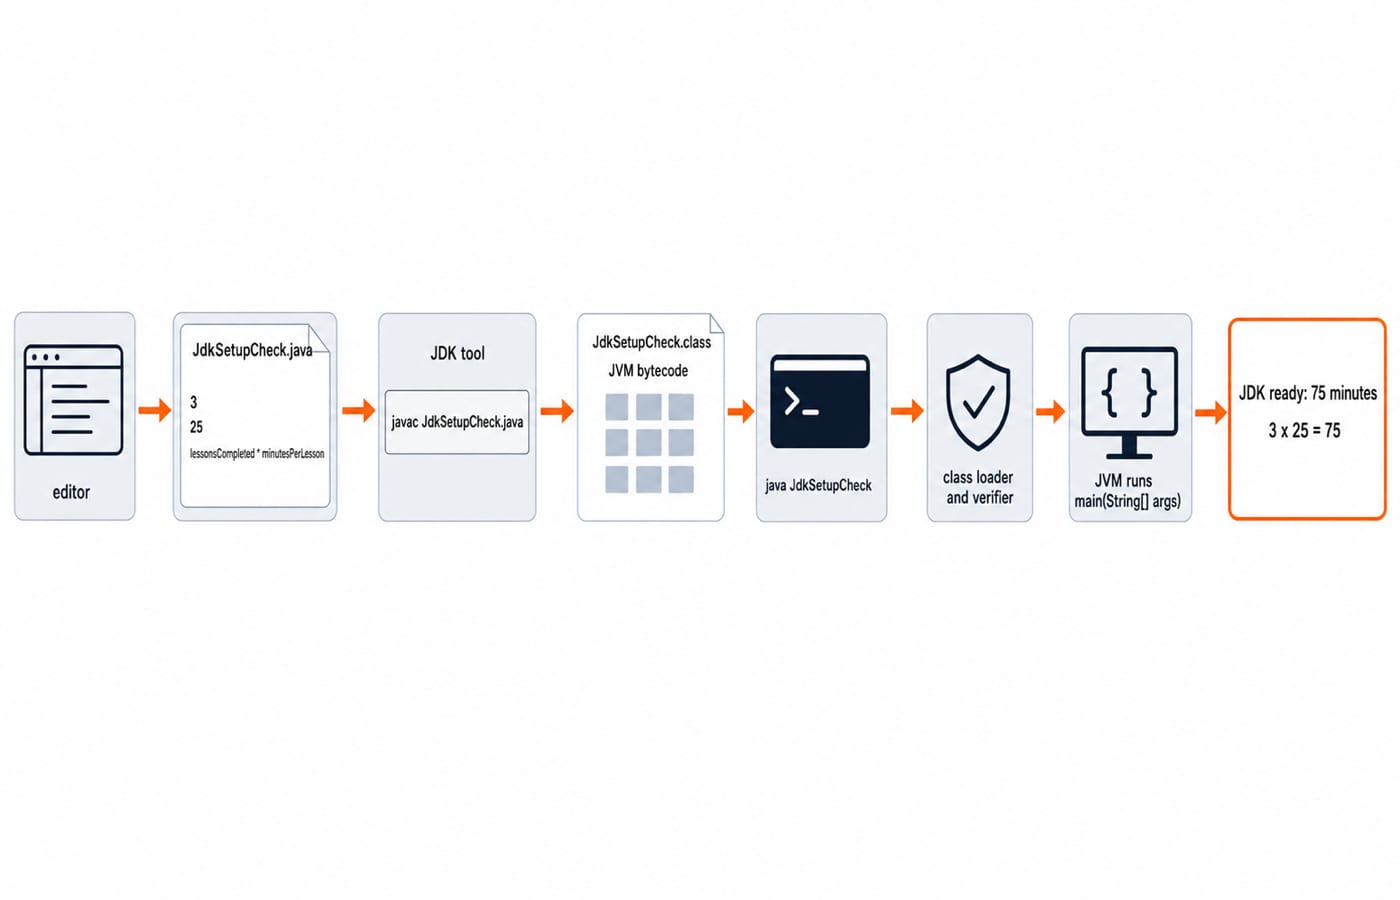
The JVM does not compile source, and these are not three unrelated downloads. Follow JdkSetupCheck.java -> javac -> JdkSetupCheck.class -> java launcher -> JVM -> output.
2. Install a full JDK and connect it to the terminal
Use the JDK version required by your course, project or team. Getting Started with Java links current JDK builds and installation guidance. Choose the package for your operating system and processor, run its installer or package-manager command, and record the installed JDK root. A runtime-only installation cannot provide javac.
Platform | Example JDK 21 root | What to remember |
|---|---|---|
Windows |
| Your vendor or installer may choose another path |
macOS |
| Use the root detected on your machine |
Linux |
| Replace this example with the installed root |
The exact root depends on the JDK build and installer. JAVA_HOME points to that root, not its bin directory. Add the root's bin directory to PATH so the shell finds both commands.
On Windows, open Edit the system environment variables, create JAVA_HOME, and add %JAVA_HOME%\bin to Path. For an installation at the example root, the values are:
JAVA_HOME=C:\Program Files\Java\jdk-21
PATH entry=%JAVA_HOME%\bin
On macOS, ask the operating system for the installed JDK 21 root:
export JAVA_HOME=$(/usr/libexec/java_home -v 21)
export PATH="$JAVA_HOME/bin:$PATH"
For the example Linux root:
export JAVA_HOME=/usr/lib/jvm/jdk-21
export PATH="$JAVA_HOME/bin:$PATH"
The macOS and Linux export commands affect the current shell. Add them to your shell's startup file only when you want that JDK selected in future terminals, then open a new terminal.
3. Verify the JDK before opening an IDE
Run four checks in the new terminal:
Runtime:
java -versionCompiler:
javac -versionHome:
echo %JAVA_HOME%on Windows, orecho "$JAVA_HOME"on macOS and LinuxLocations:
where javaandwhere javacon Windows, orcommand -v javaandcommand -v javacon macOS and Linux
A consistent JDK 21 result could show 21.0.2 from java -version, javac 21.0.2 from javac -version, the chosen JDK root from JAVA_HOME, and both executables inside that root's bin directory. Your patch number may differ; the feature versions and resolved JDK should agree.
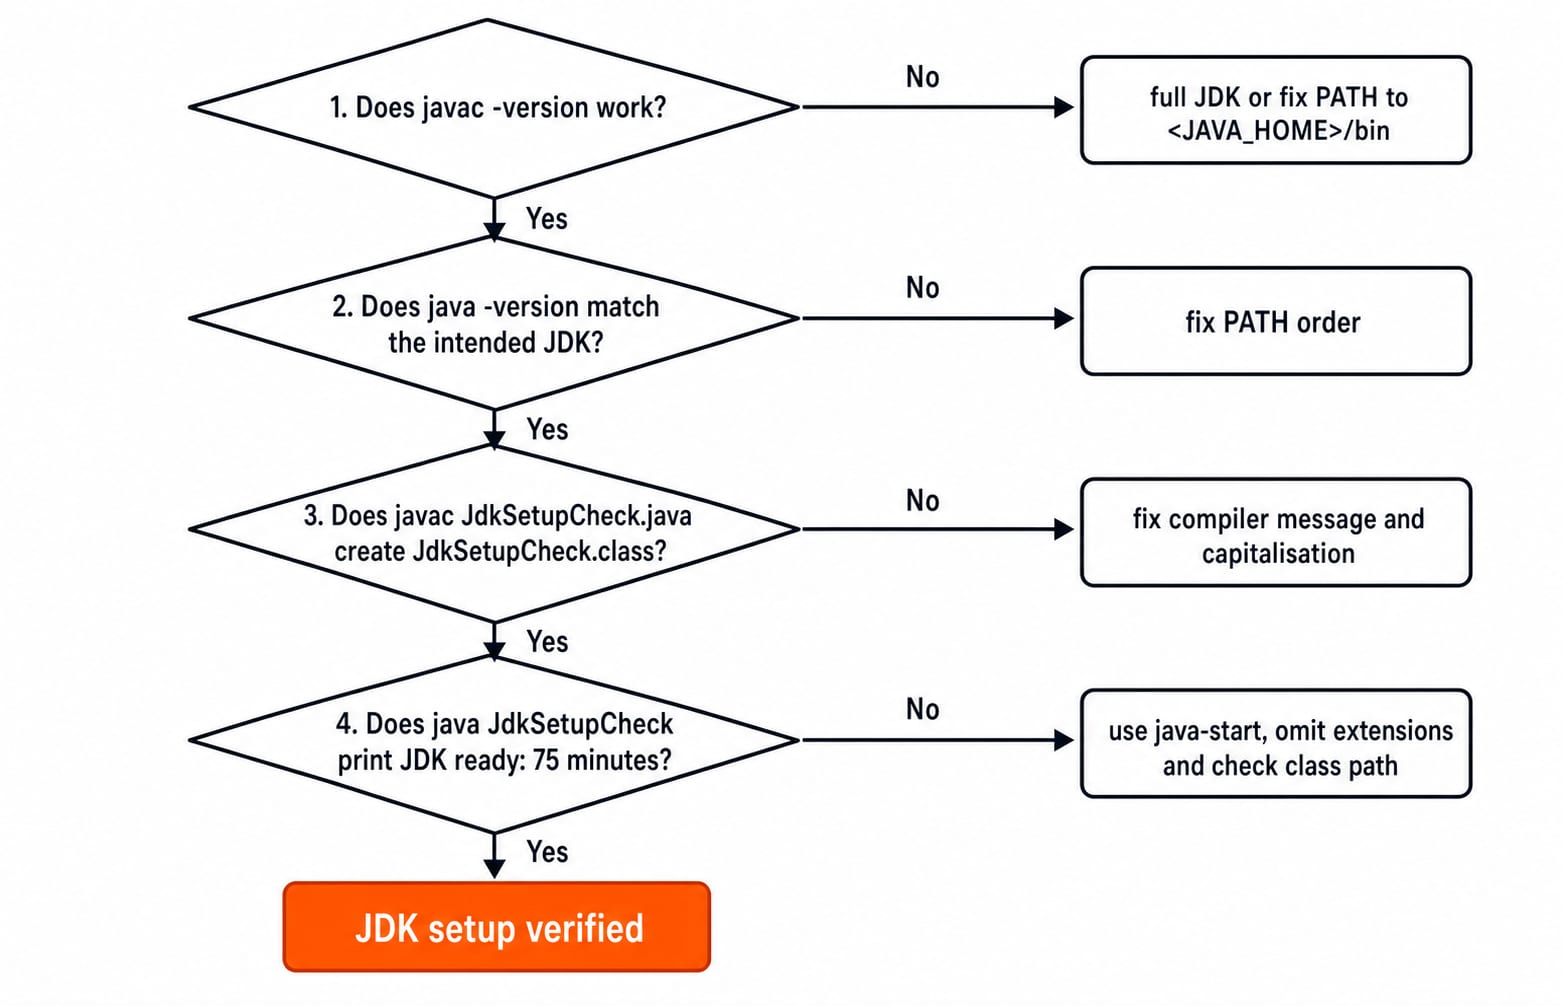
Pass only if both commands exist, their feature versions match, and their paths reach the intended JDK. If java works but javac does not, repair the JDK or PATH before installing an IDE. An IDE wraps the toolchain, it does not replace it.
4. Fully worked example: compile and run JdkSetupCheck
Create an empty java-start folder, open a terminal there, and save this exact file as JdkSetupCheck.java. The public class and file names must match in capitalisation.
public class JdkSetupCheck {
    public static void main(String[] args) {
        int lessonsCompleted = 3;
        int minutesPerLesson = 25;
        int totalMinutes = lessonsCompleted * minutesPerLesson;

        System.out.println("JDK ready: " + totalMinutes + " minutes");
    }
}
Compile it:
javac JdkSetupCheck.javaSuccess normally prints no message, returns to the prompt, and creates JdkSetupCheck.class beside the source. Run the class without .java or .class:
java JdkSetupCheckThe only output line is:
JDK ready: 75 minutesTrace every value. lessonsCompleted = 3 and minutesPerLesson = 25, so 3 x 25 = 75. Concatenation builds JDK ready: 75 minutes, and println adds a line break. Change nothing first.
5. What happens between source code and output
The editor saves Unicode source in JdkSetupCheck.java. javac checks syntax, names and types, then emits bytecode in JdkSetupCheck.class. The java launcher starts a JVM and requests JdkSetupCheck. The class loader finds it on the current class path, verification checks the bytecode shape, and main(String[] args) prints the result.
The compiler first recognises units such as keywords, identifiers, literals and operators. Lexical Analysis in Compiler Design: Tokens and Lexemes explains that stage in more depth.
Source targets the JVM class-file format, while each JVM targets an operating system and processor. A compatible .class can run across platforms with compatible runtimes, but may fail on an older runtime. Native libraries are not automatically portable.
6. Repair the five setup and first-run failures learners actually see
Check the toolchain before changing code.
Symptom | Likely cause | Check | Fix |
|---|---|---|---|
| JDK | Run the compiler and location checks | Add |
| The shell finds a runtime-only or different installation | Compare both resolved paths | Make both commands resolve to the intended JDK |
| File name or case is wrong | Inspect the public class and file name | Make both exactly |
| Wrong folder, extension or class path | Check the current folder and command | Run from |
| A newer JDK compiled the class than the runtime loading it | Compare | Align both commands with the intended JDK |
Debug in order. Rerun Section 3, confirm both files, delete only this exercise's stale .class, recompile, then run java JdkSetupCheck from java-start. For version mismatch, repair command resolution first.
The entry point is public static void main(String[] args). Java is case-sensitive, so jdkSetupCheck, JdkSetupCheck and JDKSetupCheck differ. Rename the source file with its public class.
7. How setup concepts are tested in questions and interviews
Typical checks distinguish JDK, JRE and JVM, identify compile and run commands, predict the generated file, trace output, diagnose path or version mismatches, and enforce file-name rules.
Test yourself:
Which command creates bytecode from this source?
javac JdkSetupCheck.java.Which file should appear?
JdkSetupCheck.class.What does
JAVA_HOMEpoint to? The JDK root, not itsbindirectory.If the values become
4and30, what line prints?JDK ready: 120 minutes, because4 x 30 = 120.
8. Java JDK setup: the short version and the next step
Use this sequence in a fresh terminal:
Install a full JDK.
Point
JAVA_HOMEto its root.Put its
bindirectory onPATH.Verify both version commands and resolved paths.
Compile
JdkSetupCheck.java.Run
java JdkSetupCheckand confirm the exact 75-minute output.
Once it works, use Java Course: Concepts, MCQs and Coding Questions next. DSA using Java: Placement Preparation Course comes later if you can run basic Java and want interview-focused problem solving.
Change the values to 4 lessons and 30 minutes. Predict JDK ready: 120 minutes, recompile, run, and compare. Afterwards, Dynamic Programming Explained: 0/1 Knapsack is a future problem-solving read, not a prerequisite.